

The dependable setup for a multi-hour timelapse is a power bank paired with a camera-specific dummy battery, or an ONsite Relay style UPS for hot-swapping on the longest shoots. Reliability comes down to three things: stable output voltage, a connection that cannot work itself loose, and enough capacity to outlast the shoot. Bench test the full chain for the duration you expect before you ever leave it unattended overnight.
TL;DR:
- Most DSLRs and older mirrorless cameras need a compatible dummy battery; newer mirrorless bodies may accept direct USB C power, so verify manufacturer guidance first.
- Choose a true USB C Power Delivery bank with confirmed pass through support, and check for low draw auto shutoff that can interrupt camera power.
- Estimate runtime in usable watt hours, then reserve 20% to 40% for conversion losses and cold; test the complete camera, cable, and bank setup.
- Secure the cable to the tripod and leave a service loop near the camera; loose connections are a more common failure than depleted capacity.
- For shoots that outlast one bank, a relay with an internal battery keeps the camera powered while you swap external packs.
Table of Contents
- Three methods that actually keep a camera running
- Choosing a power bank built for timelapse duty
- Wiring a dummy battery, coupler, or relay correctly
- Field reliability: cables, strain relief, and temperature
- Estimating runtime: a three-step calculation
- Why a rugged, high-capacity bank changes the odds
- Charging and discharging habits that extend a bank’s life
- Staying safe with a high-capacity bank on a long shoot
- Matching a power bank to your camera model
- Adding solar for sessions that run past a day
- Cutting power draw to stretch every charge
- Field note: the one habit that prevents most failures
- Carry enough power to stop worrying about the shoot
- FAQ
- Sources
Three methods that actually keep a camera running
Three approaches cover almost every timelapse setup, and the right one depends on your camera and how much risk you can tolerate.
- Dummy battery plus power bank: a DC coupler shaped like your camera’s battery replaces it internally, pulling power from an external bank through a cable, and it is the standard fix for DSLRs and most mirrorless bodies that lack true pass-through charging.
- Direct USB-C powering: some newer mirrorless cameras accept USB-C power directly and display a power icon when connected, which removes the need for a dummy battery on models that support it, as Sony documents for its own lineup.
- Relay or UPS system: a unit like the ONsite Relay sits between the power source and the camera with its own internal battery, so you can swap an external pack without a single frame of downtime.
Dummy batteries remain necessary for most DSLRs and older mirrorless bodies because their USB ports were built for data or light charging, not sustained power delivery. A relay earns its keep when a shoot runs longer than one power bank can cover and you need to swap packs mid-sequence without interrupting the exposure cycle.
Choosing a power bank built for timelapse duty
Capacity on the label is not capacity you get. A bank’s milliamp-hour rating assumes its own internal voltage, and once that gets converted to the 5V or higher your camera actually uses, you lose a meaningful share to conversion inefficiency, so treat the printed mAh figure as optimistic.
- Check for a true PD-rated USB-C port, not just Quick Charge, since PD negotiates a stable voltage that cameras and dummy batteries tolerate better.
- Look for pass-through or simultaneous charge-and-output support, and confirm it in the manual rather than assuming every bank with a USB-C port behaves the same way.
- Watch for auto-shutoff at low draw, a common failure where a bank designed for phones cuts power because a camera’s standby draw looks too small to register as a load, a behavior field photographers on the lrtimelapse forum have run into repeatedly.
- Prioritize an IP-rated, drop-tested housing if you shoot outdoors, since dust, rain, and a tripod bump are routine hazards on a multi-hour shoot.
Pro Tip: Run a bench test with your exact camera and cable for at least an hour before trusting any bank with an unattended overnight shoot.
Wiring a dummy battery, coupler, or relay correctly
A dummy battery or DC coupler converts incoming power into the precise voltage and pin configuration your camera’s battery compartment expects, which is why a generic cable rarely works and a camera-matched coupler does, as Tether Tools explains. The coupler slides in like a normal battery, and a thin cable runs out through the battery door or a dedicated cable port to the external bank.
A relay system adds a buffer: the ONsite Relay carries its own internal 1,200 mAh battery, so when you unplug one external pack to connect a fresh one, the camera keeps running off the internal cell during the swap instead of losing power.
Before any unattended shoot, run this photography workshop packing list sequence:
- Charge the power bank fully and confirm the camera’s internal battery (if present) is also charged, since some cameras still need it to operate correctly.
- Connect the dummy battery or coupler and seat it firmly in the battery compartment.
- Power on the camera and verify it shows a USB power or charging icon on screen.
- Run a short interval test of 10 to 15 frames to confirm stable shutter timing before you commit to the full shoot.
Field reliability: cables, strain relief, and temperature
The single most common failure on a long outdoor timelapse is not the power bank itself. It is a cable that works loose, according to field reports from the Foolography community, where photographers consistently point to connection failures over capacity shortfalls.
- Zip-tie the cable to the tripod leg near the camera mount so wind or an accidental tug pulls on the tie, not the connector.
- Loop a small service loop before the connector enters the camera, which absorbs tension without transmitting it to the contact point.
- Route the dummy battery cable through the manufacturer’s cable port or flap so the battery door still closes, keeping moisture out and the coupler seated tight.
Cold weather shrinks usable capacity fast. Wrapping the power bank in a fleece sleeve or a small insulated pouch helps it hold output longer, and some photographers tuck a chemical hand warmer alongside the bank, never directly against it, to slow heat loss in sub-zero conditions.
Pro Tip: Keep the hand warmer separated from the bank by a layer of fabric so you warm the air around it instead of one hot spot on the casing.
Estimating runtime: a three-step calculation
Planning power for an 8-hour shoot starts with three steps.
- Find your camera’s average draw in watts or milliamps during interval shooting, usually listed in the manual or measurable with a USB power meter.
- Convert the power bank’s capacity to usable watt-hours and divide by that draw to get a raw estimated runtime.
- Subtract 20 to 40% for conversion losses and temperature effects before you treat the number as a real plan.
Say a mirrorless camera draws roughly 2.5 watts during interval shooting and your bank holds about 74 usable watt-hours after conversion loss. That gives a raw estimate near 29 hours, but reserving a safety margin for cold and cable inefficiency brings the dependable number closer to a day or so, still comfortably past a typical overnight shoot. Community testing on the Foolography forum reports roughly eight hours of real-world runtime on a Sony A6700 using a dummy battery and a modern power bank, with capacity left over. Test under your own real conditions and keep a reserve rather than trusting the raw math alone, and our runtime estimate guide walks through the same three-step method with more worked examples.
Why a rugged, high-capacity bank changes the odds
A timelapse that runs for 8 or more unattended hours punishes a bank with low capacity or a flimsy housing, and that is the gap the Ifory Powerbank is built to close.
- A large capacity gives enough headroom for a full day’s shoot plus the safety margin that cold weather and conversion loss demand.
- Fast power delivery means a true PD-negotiated connection, the kind that avoids the auto-shutoff quirks common on phone-oriented banks.
- Waterproofing and an anti-drop structure matter when the bank sits on wet ground or gets bumped by a tripod leg overnight.
- A live LED display shows remaining charge at a glance, so you can judge whether a swap is needed before the camera goes dark.
- An integrated flashlight helps with a cable check or a battery swap in the dark without a second tool in your bag.
Multiple ports mean you can run a camera and a backup light or phone from the same bank, which can be useful once a shoot runs past dinner.
Charging and discharging habits that extend a bank’s life
A power bank’s usable life depends more on how you treat it between shoots than on how often you use it.
Charge before a shoot, not weeks in advance, and avoid leaving a bank plugged in long after it hits full. Most modern banks stop drawing current once they peak, but heat from a warm charger left connected overnight still adds wear over time. If a bank will sit unused for more than a month, storing it around the 50% mark rather than full or empty slows the chemical aging that shortens lifespan, a point we cover in more detail in our power bank lifespan guide.
Avoid letting a bank sit fully drained for extended periods, since a deeply discharged lithium cell degrades faster than one cycled normally. Heat is the other major factor: a bank baking in a car trunk or left in direct sun loses capacity over its lifetime faster than one kept at moderate temperature, so shade it in the field whenever the shoot allows.
Fast charging at 100W is convenient, but alternating with a slower charge occasionally reduces the cumulative heat a cell sees over its lifetime. None of this demands obsessive habits, just avoiding the two extremes of always-full storage and always-empty storage, and keeping the bank out of serious heat when you can.
Staying safe with a high-capacity bank on a long shoot
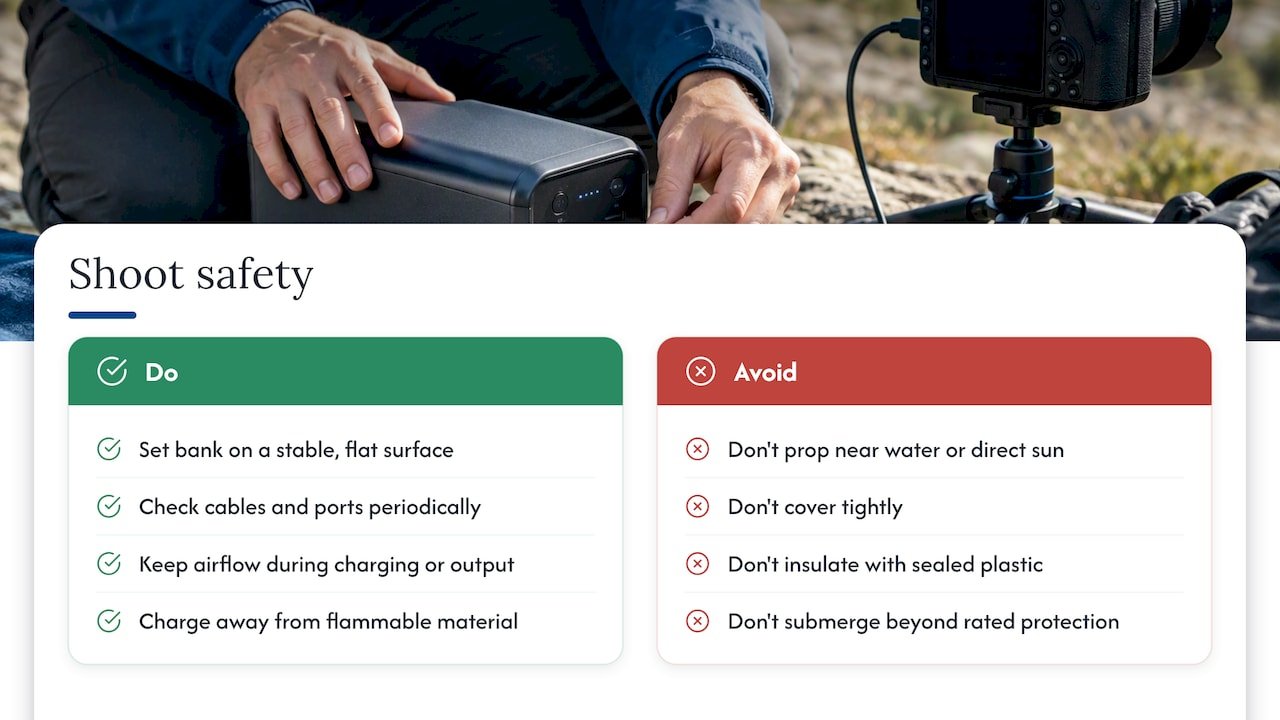
A 40,000mAh bank carries enough stored energy that a few sensible habits go a long way on an unattended, multi-hour shoot. Keep the bank on a stable, flat surface rather than propped against something that could tip it into standing water or direct sun for hours.
Check cables and ports periodically if you can access the setup mid-shoot, since a damaged cable under continuous load is a more realistic risk than the bank itself. A rugged housing with an IP67 rating and drop protection, like the one built into the Ifory Powerbank, reduces the chance that weather or an accidental knock compromises the unit mid-shoot.
Avoid covering the bank tightly in a way that traps heat during fast 100W charging or high-draw output, since airflow helps a cell shed heat naturally during sustained use. If you are insulating against cold, use breathable fabric like fleece rather than a sealed plastic bag, which can trap moisture against the casing.
Never submerge a bank beyond its rated protection, and treat an IP67 rating as splash and brief-immersion resistance for field conditions, not an invitation to leave it sitting in a puddle for the full shoot. Charge and run high-capacity banks away from flammable material as a standard precaution during any extended unattended session, the same way you would treat any stored energy device left running overnight.
Matching a power bank to your camera model
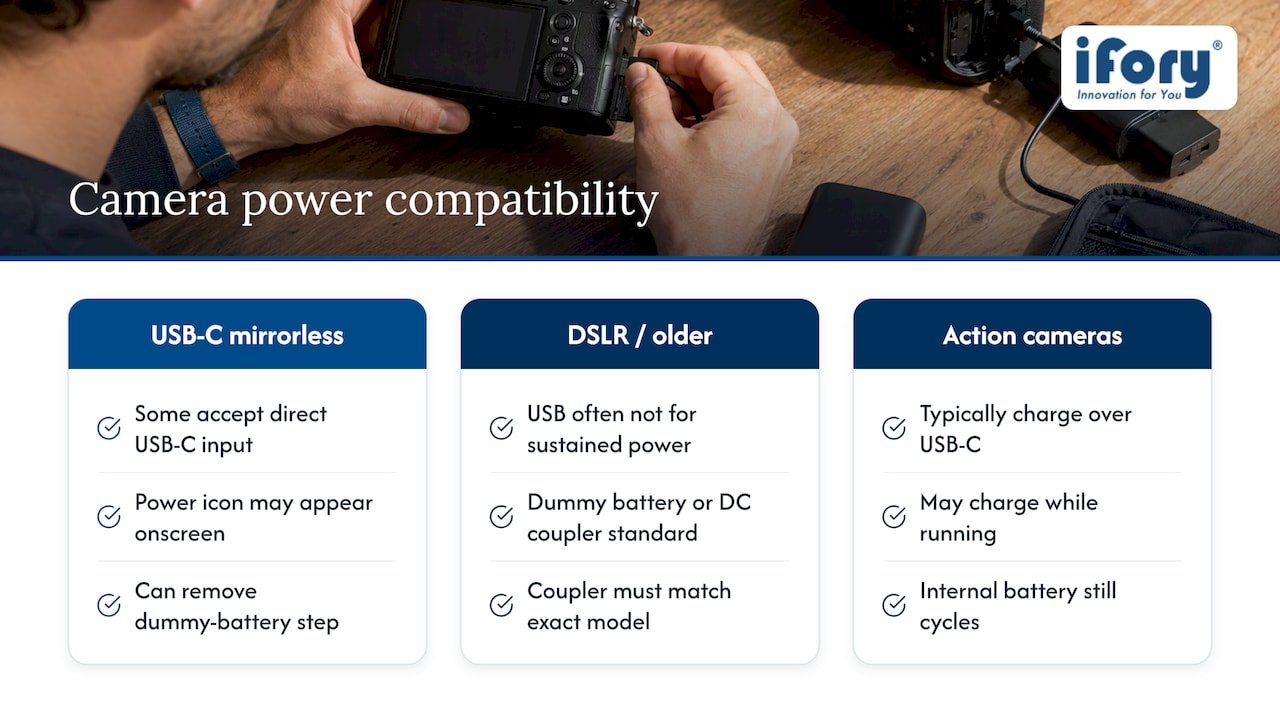
Compatibility comes down to what your specific camera accepts, not what the power bank advertises. Some mirrorless bodies accept direct USB-C input and will show a power icon on screen when connected, a behavior Sony documents for several of its camera lines, which removes the dummy battery step entirely for those models. Our guide to cameras that charge via USB-C walks through how to confirm whether your specific body qualifies.
Most DSLRs and a large share of older mirrorless cameras were not designed for sustained external power through their USB port, which is why a dummy battery or DC coupler stays the standard solution for those bodies. The coupler has to match your exact camera model since battery compartment shapes and voltage requirements differ even within the same manufacturer’s lineup.
Action cameras like GoPro models typically charge over USB-C but behave differently than mirrorless bodies: many will charge while running rather than truly bypass the internal cell, so expect the internal battery to still cycle even while connected to a bank. Checking the camera manufacturer’s own support documentation before buying a coupler or relay saves a wasted purchase, since a coupler built for one model rarely fits another even in the same product family.
If you are also running a laptop or tablet alongside the camera for tethered capture, confirm your bank’s wattage covers both devices simultaneously; our guide on rugged banks for USB-C laptops covers that math for off-grid setups.
Adding solar for sessions that run past a day
A portable solar panel extends a timelapse well past what any single power bank can hold, which matters for multi-day, off-grid shoots where recharging from the grid is not an option. The practical setup pairs a panel with a PD-capable bank so the bank charges whenever light is available and discharges to the camera at night or during cloud cover.
Position the panel for direct, unobstructed sun exposure rather than propping it flat on the ground, since even partial shade across a panel’s cells can cut output more than the shaded area alone would suggest. A 40W panel paired with a high-capacity bank gives a reasonable buffer for a camera’s low, steady draw, though actual charging speed depends on sun angle and cloud cover through the day, a relationship we cover in our solar charging in shade guide.
Keep the panel-to-bank cable short and secured the same way you would secure the camera’s power cable, since a loose solar connection wastes charging hours just as easily as a loose camera connection wastes shooting hours. Our PD 40W solar panel is built to pair with a PD-rated bank for exactly this kind of extended, unattended setup, and checking real-world solar math before committing to a multi-day plan avoids assuming more charging speed than daylight actually delivers, a point we break down further in our arithmetic on solar power banks.
Cutting power draw to stretch every charge
The easiest way to extend runtime is reducing what the camera draws in the first place, since every watt saved is a watt you do not need to carry in bank capacity. Longer intervals between frames let the camera’s sensor and processor sit idle more of the time, which matters more for draw than resolution or file format choices.
Turning off image review on the camera’s screen after each frame removes one of the more significant recurring draws on many mirrorless bodies, since the display itself consumes more power than the shutter cycle. Disabling Wi-Fi, Bluetooth, and GPS if your camera has them running in the background removes a steady drain that serves no purpose during an unattended timelapse.
Using a wired shutter trigger or the camera’s built-in interval timer instead of a phone app connected over Bluetooth avoids keeping a wireless radio active for the full shoot. Setting the LCD brightness to its lowest usable level, or turning the screen off entirely between checks, trims another small but steady draw over many hours.
None of these changes replace adequate power bank capacity, but combined they can meaningfully lower the draw your runtime math in the earlier section needs to cover, giving you a larger safety margin for the same bank.
Field note: the one habit that prevents most failures
If I had to narrow every lesson here to one sentence: secure the physical connection and test the entire chain, bank, cable, and camera, for the full expected duration before you walk away from it. Most failed timelapses trace back to a cable that worked loose at hour four, not a bank that ran dry.
Run the math with our runtime estimator before your next shoot, then confirm it against a real bench test. The numbers only matter if the connection holds.
— Mats
Carry enough power to stop worrying about the shoot
A timelapse setup fails more often from running out of margin than from any single bad component, which is exactly why we built the Ifory Powerbank around capacity and ruggedness rather than just a high headline number.

- 40,000mAh and 100W PD charging cover a long unattended shoot with margin left for cold weather and conversion loss.
- IP67 waterproofing and anti-drop protection mean weather and an accidental knock do not end your shoot early.
- A live LED display and built-in flashlight make checking status or swapping a cable in the dark simple.
- Pair it with our PD 40W solar panel for multi-day, off-grid sessions where recharging from the wall is not an option.
Check the Ifory Powerbank and accessories for your next shoot, or reach out through our contact page if you want help matching a setup to your camera.
FAQ
Does timelapse photography drain a lot of battery?
A timelapse draws power steadily over many hours rather than in short bursts, so even a modest per-frame draw adds up to a meaningful total across an 8 or more hour shoot. The exact drain depends on interval length, screen use, and whether wireless radios stay active, which is why reducing those draws extends runtime more than people expect.
What is the fastest charging portable power bank?
Charging speed depends on both the power bank’s maximum wattage and the charger or outlet feeding it, with banks rated for 100W USB-C Power Delivery, like the Ifory Powerbank, charging faster than banks limited to older Quick Charge standards. Always confirm the charger you pair with the bank also supports the higher wattage, since a mismatched charger caps the speed regardless of the bank’s rating.
How long does a 20 second interval timelapse run on an iPhone?
This depends entirely on the total shoot duration you set rather than the interval itself, since a 20 second interval over a short session uses little battery, while the same interval run for several hours draws down a phone’s battery steadily. Checking the camera manufacturer’s own power guidance, as Sony outlines for its camera lineup, gives a clearer sense of real-world draw than interval length alone.
Can a GoPro run off a power bank during a long timelapse?
Most GoPro models charge over USB-C and can run connected to a power bank, though many will cycle the internal battery alongside the external charge rather than fully bypassing it. Confirming your specific GoPro model’s charge-while-running behavior in its own manual avoids surprises on an unattended shoot.
Do I need a dummy battery if my camera has a USB-C port?
Not always. Some newer mirrorless cameras accept direct USB-C power and display a charging icon without any coupler, while many DSLRs and older mirrorless bodies still need a dummy battery because their USB port was not built for sustained power delivery. Checking your camera manufacturer’s documentation, as Sony provides for its own models, confirms which category your camera falls into.
Sources
- ONsite Relay A Camera Power System | Tether Tools
- How to shoot and power your camera using a mobile battery | Sony USA
- Power solutions for long time lapses – Foolography Community
- Tether Tools ONsite Relay Camera Power System CRUPS110 B&H Photo